1 Policy summary
This policy summarises what the totally implantable venous access device (TIVAD) or Port-a-Cath devices are, reasons they are required within the care of some children and young people and adults. It also details the nursing care required to maintain their safe and effective use.
2 Introduction
A totally implantable venous access device (TIVAD) or Port-a-Cath is used for patients who need repeated long term intravenous drug therapy. In many cases, other forms of venous access may have become difficult or impossible (Janes, Royle, Davies and Gannon 2008). TIVADs are widely used in people with Cystic Fibrosis (CF) to provide intermittent venous access for therapeutic infusions. Reports of their use in people with CF suggest that they are safe and effective (Cochrane Library 2012).
3 Purpose
The policy is based on national guidelines for the management of a Port-a-Cath utilising sound infection prevention and control principles. The purpose of this policy is to promote the appropriate and safe use of Port-a-Caths for the care of children and young people and provide guidance for colleagues to:
- safely access line when required
- choose a relevant dressing and renew when appropriate
- record the intervention
3.1 Definitions or explanation of terms used
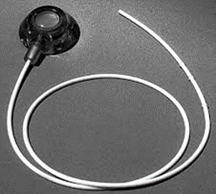
3.1.1 Totally implantable venous access device (TIVAD) or Port-a-Cath
A Port-a-Cath is a totally implantable venous access device (TIVAD) that consists of a portal, a small metal (usually titanium) or plastic chamber, that is sealed at the top with a silicone septum and a thin flexible catheter, made from either polyurethane or silicone. The silicone septum will withstand 1000 to 3600 punctures with a 20 or 22-gauge Huber point needle (Hadaway 2010; Hayden and Goodman 2005; Perucca 2001). Needle gauge is selected dependent on type and rate of infusate as well as the location of the port (Weinstein 2000). Titanium and plastic ports are compatible with Magnetic resonance imaging (MRI) techniques (Perucca 2001).
3.1.2 Valsalva manoeuvre
The Valsalva manoeuvre is performed by moderately forceful attempted exhalation against a closed airway, usually done by the patient closing the mouth, pinching the nose shut while pressing out as if blowing up a balloon. The manoeuvre is indicated when the Port-a-Cath line tip is blocked (see 5.5).
4 Scope
The policy applies to all children’s community nurses and adult physical health community nurses within Rotherham Doncaster and South Humber NHS Foundation Trust (trust) whose duties will include delivering care to patients with a Port-a-Cath in the community setting.
In appropriate circumstances patients or their carers can be trained, under instruction from appropriately trained staff, to use the system for administering antibiotics in the home (Cochrane Library 2012).
For further information about responsibilities, accountabilities and duties of all employees, please see appendix A.
5 Procedure
5.1 Quick guide
5.1.1 Consent
Obtain consent from the patient or their parent or carer and discuss the procedure in a manner suitable to the child or young persons individual situation.
5.1.2 Patency
Port-a-Caths need to be flushed every 4 to 6 weeks to maintain patency. The purpose of flushing procedure is to ensure that patency of the lumen is maintained. The line is to be flushed with 10ml normal saline 0.9% followed by Heparin Sodium as prescribed (see procedure). The concentration of heparin should be the lowest possible that will maintain patency.
5.1.3 Long-term complications
These include extravasation, catheter blockage due to thrombosis, local and systemic infection associated with the insertion and maintenance of central venous catheters (CVC) and breakdown of skin integrity over the portal.
5.1.4 Infection prevention and control
The policy shares at each stage the levels of IPC required to ensure safe care and minimise the risk of infection.
There are also the Clinell hand wipes that can be used if liquid soap and paper towel or kitchen roll is not available but in most instances hand rub will be sufficient.
See flow chart for aseptic non touch technique.
5.1.5 Record keeping
Accurate records must be made as soon after the procedure as possible.
If there is no time to make a full entry, record the pertinent information including medication changes and risk.
The patient must have an individualised care plan in their electronic clinical records for the care of their Port-a-Cath.
5.2 Implantation and immediate care post procedure
This policy should be read in conjunction with the Royal Marsden manual.
5.2.1 Implantation
Originally these devices were all sited subcutaneously on the anterior chest wall, for example, Port-a-Cath. They are inserted under local anaesthetic and sedation by a radiologist under X-ray guidance, or by General Anaesthetic if appropriate. The Port-a-Cath can be accessed immediately if required. More recently, implantation sites are selected by collaboration with the patient, taking into consideration lifestyle and activities undertaken. Patient preference for insertion site is important as they can remain in place for several years. (Goodwin and Carlson 1993). Weinstein and Hagle (2014)

The most common veins used are subclavian, internal or external jugular veins, cephalic or femoral vein. Ports can also be inserted in the antecubital area of the arm (Hadaway 2010; Hayden and Goodman 2005; Perucca 2001).
5.2.2 Complications and care immediately post insertion (hospital setting)
Post-procedure complications attributed to Port-a-Cath’s should be minimal. However, the patient should be observed for complications associated with any invasive procedure, such as infection, haematoma, surgical emphysema or accumulation of serous fluid at the implant site (Smiths Medical 2011). Following Port-a-Cath implantation it is advisable to monitor the patient in hospital for as long as clinically indicated and a chest x-ray should be performed if a pneumothorax is suspected. If the patient’s condition remains satisfactory following a Port-a-Cath insertion, and there are no signs of pneumothorax or other complication, discharge home can be the following day.
5.3 Continuing care of a patient with a Port-a-Cath
5.3.1 Complications
Long term Port-a-Cath related complications can also occur. These include extravasation, catheter blockage due to thrombosis, local and systemic infection associated with the insertion and maintenance of central venous catheters (CVC) and breakdown of skin integrity over the portal (Department of Health (DH) 2010). If a patient has pyrexia or complains of any symptoms such as pain, swelling or discolouration of the skin, a doctor or person expert in Port-a-Cath complications, for example, specialist nurses, should be informed immediately so that the problem can be investigated.
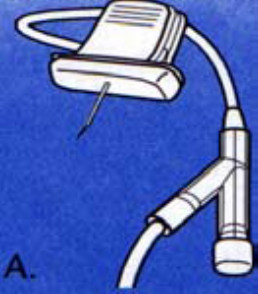
5.3.2 Needles
Only Huber point (non-coring) ‘Gripper’ needles should be used to access a Port-a-Cath to prevent coring of the silicone septum (Dougherty 2006). Needle length needs to be verified correct for portal or patient; if too long, needle and, or portal may be damaged at insertion; if too short, needle may not completely pierce portal septum, and medication may be delivered into surrounding tissue and, or needle may be blocked. (Smiths Medical 2011). Selection of needle length according to patient body mass index (BMI) and depth of insertion needs consideration.
5.3.3 Patency
Port-a-Caths need to be flushed every 4 to 6 weeks to maintain patency. (Weinstein 2007; Camp Sorrell 2004). The purpose of flushing procedure is to ensure that patency of the lumen is maintained.
The line is to be flushed with 10ml normal saline 0.9% followed by Heparin Sodium as prescribed (see procedure). The concentration of heparin should be the lowest possible that will maintain patency; usually 10iu heparin in 1 ml 0.9% sodium chloride except with implanted ports which may require 100iu/ml heparin (Royal College of Nursing (RCN) 2010).
It is important to use a positive pressure flushing technique. This is thought to minimise reflux of blood into the tip of the catheter and thus prevent clotting. (RCN 2016).
A positive pressure flush can be best accomplished by applying positive pressure on the syringe plunger throughout the flush and clamping the extension line just prior to the syringe being completely empty.
5.3.4 Syringes
A vital consideration is that syringe size directly impacts the amount of pressure (psi) generated by the syringe. Excessive pressure may result in catheter rupture and embolisation. It is important to use syringes of 10ml or greater size when administering flushes or drugs creating a pressure of less than 40 psi. (Smiths Medical 2011; Baranowski 1995).
5.3.5 Devices
It is recommended that peripheral devices, for example, bungs, Bionectors used to access points are changed every 2 weeks.
5.4 Procedure for accessing and maintenance flushing of a Port-a-Cath
Note, this procedure is for maintenance flushing of Port-a-Caths. If the needle is to remain in for ongoing treatment, please refer to the procedure to allow access for intravenous therapy below.
5.4.1 Equipment
- Sterile dressing pack including apron.
- Sterile gloves of appropriate size.
- Clinell universal wipes.
- ChloraPrep 2%, 3ml sponge applicator.
- 2 Luer Lock syringe 10ml.
- 1 Blunt fill needle with filter for a glass vial or 1 drawing up blunt needle for a plastic vial. Or a filter medical straw.
- 10ml Sodium chloride 0.9% for injection as prescribed or under patient group direction (PGD).
- Heparin Sodium as prescribed or under PGD.
- Huber non-coring ‘Gripper’ plus needle 20 or 22 gauge (appropriate length).
- Sharps container.
- Trust approved alcohol and rub.
- Ethyl Chloride spray to use as required (if Emla or Ametop cream has not been prescribed).
- Appropriate waste bag.
This is an aseptic non-touch technique (ANTT). See flowchart appendix C.
| Step | Principle | Rationale |
|---|---|---|
| 1 | Explain and discuss the procedure to the patient and gain verbal consent (or carer if young child) | To ensure the patient understands the procedure and gives their valid consent |
| 2 | Assist patient into a suitable position, supine or sitting in chair. Ensure patient understands procedure (appropriate to age) | For patient comfort and ease of access |
| 3 | Ascertain that the patient has had no pain or discomfort with the Port-a-Cath before palpating the position of the portal. If pain or swelling present seek expert advice.
Decontaminate hands with trust approved alcohol hand rub, prior to palpating the position |
Pain may indicate infection or dislodgement of the Port-a-Cath. Referral for line-a-gram may be required |
| 4 | Check with patient or carer where Port-a-Cath is sited and locate port by palpation | Port-a-Caths may be sited in various sites, for example, chest wall, mid-axillary line, arms |
| 5 | Clean dressing area with Clinell universal wipes (wear gloves to do this ). Allow area to dry.
Wash hands, open packs onto clean dressing area, place equipment on sterile field, decontaminate hands with trust approved alcohol hand rub and put on sterile gloves and apron |
To minimise the risk of infection |
| 6 | Clean skin with ChloraPrep 3ml applicator, starting at the portal and working outwards in a spiral motion to at least 8cm over 30 seconds. Allow to dry | To minimise the risk of infection |
| 7 | Prime the Huber needle and extension tubing with 0.9% sodium chloride. Leave the syringe attached. Close the clamp on the extension tube | To prevent air entry.
To ensure needle is patent. To prevent backflow of blood when Port-a-Cath is accessed |
| 8 | Locate the dressing field close to the Port-a-Cath. Relocate and stabilise the portal by placing first and middle fingers of non-dominant hand either side of the Port-a-Cath | To provide a sterile area to rest the attached syringe.
To prevent the Port-a-Cath from moving when the needle is inserted |
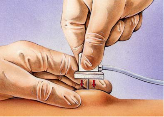
| 9 | Push the Huber non-coring needle at a 90-degree angle to the Port-a-Cath firmly through the skin and the silicone septum until the needle touches the metal at the back of the Port-a-Cath, as illustrated below. Note, this can often be felt as a tap (see image below) | To gain access to the Port-a-Cath |
| 10 | Open clamp and after checking for flashback of blood to confirm patency, slowly inject sodium chloride, adopting a pulsating motion to create turbulence within the line.
Ask the patient if they experience any pain on flushing. Observe the site for any swelling |
To flush Port-a-Cath and maintain patency.
There is no requirement to routinely withdraw blood and discard it prior to flushing (RCN 2016). Correct flushing technique contributes significantly to the preservation of line patency. Pain and, or swelling could indicate a misplaced needle or other complication |
| 11 | Assess patency of Port-a-Cath whilst injecting sodium chloride | If the needle is correctly placed and the Port-a-Cath is patent, there should be little resistance |
| 11a | If resistance is felt, check that the needle is located correctly and is touching the back of the Port-a-Cath and you have released the clamp | If the needle is not touching the back of the Port-a-Cath the silicone septum will block the hole in the side of the needle |
| 11b | If the needle is thought to be correctly located and resistance is still felt, seek expert advice | Port-a-Cath will need further investigation so that appropriate treatment can be commenced |
| 11c | If there is any doubt that the needle is incorrectly sited, it may be necessary to remove the needle and site a new one | A misplaced needle will result in pain and resistance when flushing |
| 12 | Apply positive pressure on the syringe plunger before closing the clamp. Close clamp and remove syringe | To prevent backflow of blood and air entry to the line |
| 13 | Attach syringe containing prescribed heparin sodium, open clamp, inject heparinised sodium and close clamp using positive pressure prior to clamping | To prevent flow of blood into the line which may result in line blockage |
| 14 | Relocate and stabilise the Port-a-Cath by placing first and middle fingers of non-dominant hand either side of it and gently but firmly pull the needle out | To prevent the movement of the Port-a-Cath on withdrawal of the needle |
| 15 | Repeat flushing of Port-a-Cath every 4 to 6 weeks. (RCN 2016; Weinstein 2007) | Flushing procedure is to ensure patency of the Port-a-Cath lumen is maintained |
| 16 | Discard used equipment and waste according to trust policy | Protection of patient, colleagues, and environment |
Step 9, push the Huber non-coring needle at 90-degree angle to the Port-a-Cath, demonstrated below.
5.5 Procedure to allow access to a Port-a-Cath for intravenous therapy
5.5.1 Equipment
- Sterile dressing pack and apron.
- Sterile gloves of appropriate size.
- ChloraPrep 2%, 3ml sponge applicator.
- 2 Luer Lock syringe, 10ml.
- 1 Blunt fill needle with filter for a glass vial or 1 drawing up blunt needle for a plastic vial. Or a filter medical straw.
- 10ml Sodium chloride 0.9% for injection as prescribed or under PGD.
- Heparin Sodium as prescribed or PGD.
- Huber non-coring ‘Gripper’ plus needle of appropriate gauge and length.
- Bionector, or suitable needle-less bung.
- Sterile scissors.
- Transparent semi-permeable dressing, check for allergies to different brands.
- Sharps container.
- Ethyl chloride spray if required.
- Appropriate waste bag.
Note, if allergic to all brands for transparent dressing, Softpore may be used as an alternative, although patient will need to ensure dressing is changed after bathing as this dressing is not waterproof.
This is an aseptic non-touch technique (ANTT).
| Step | Action | Rationale |
|---|---|---|
| 1 | Follow procedure for flushing numbers 1 to 13. | To access Port-a-Cath |
| 2 | Attach Bionector bung | To allow needleless access |
| 3 | Remove the white plastic gripper top from the Huber needle | Prevent the needle fracturing. To provide patient comfort |
| 4 | Apply a clear on-permeable dressing over the needle area and the transparent semipermeable dressing over the top ensuring the whole area is sealed, and the extension line is not causing pressure on patient’s skin. (DoH 2010) | To enable dressing to be changed without dislodging needle.
To support needle and allow for showering and bathing. To prevent pressure degrading skin integrity |
| 5 | Discard used equipment and waste according to trust policy | Protection of patient, colleagues and environment |
| 6 | Document needle size used | To ensure appropriate selection on subsequent occasions |
5.6 Procedure for taking a blood sample from a Port-a-Cath
To prolong the life span of a Port-a-Cath it should ideally never be accessed purely for blood sampling. Routine blood sampling should be planned when the Port-a-Cath is accessed for flushing or Intravenous (IV) Therapy.
If a patient has had problems with a blocked or partially blocked Port-a-Cath it is advisable to take blood samples via an alternative route.
Difficulty may be encountered when taking blood samples. One of the causes is that the tip of the soft catheter lies against the wall of the vessel and the suction required to draw blood brings this into close contact, leading to temporary occlusion. There could also be a collapse of the catheter walls when using the vacuum system which may necessitate the use of syringes to obtain the blood. Measures to dislodge the tip include asking the patient to:
- cough and breathe deeply
- lie patient down
- roll from side to side
- raise his or her arms
- perform the Valsalva manoeuvre, if possible
- increase general activity, for example, walk up and down stairs
(Gorski, Perucca and Hunter 2010; Moureau 1999).
Obtaining blood samples from a Port-a-Cath can lead to inaccurate results, especially coagulation and antibiotic assays (Frey 2003). The discard method is the standard accepted method (Homes 1998). This ensures removal of any heparin or saline solution. (See following procedure).
This procedure needs to be undertaken in a timely fashion. If blood does not flow freely the procedure must be abandoned as delay may risk blood clotting in the Port-a-Cath necessitating its removal.
This is an aseptic non-touch technique (ANTT). See appendix C.
5.6.1 Equipment
- Trust approved alcohol hand rub, hand wash solution.
- Sterile dressing pack and apron.
- Sterile gloves of appropriate size.
- 1 x Chlorhexidine 2% with 70% alcohol skin wipes, individual sterile, for disinfection of hubs and connection ports
- 2 Luer Lock syringe, 10ml
- 1 Blunt Fill needle with filter.
- 2 Blunt drawing up needle (needs to be a blunt needle for plastic vial or a blunt filter needle for drawing up from a glass vial; alternatively filter medical straws can be used) x 10ml Sodium chloride 0.9% for injection.
- Microtainers used in children.
- Heparin Sodium as prescribed or under PGD.
- Huber non-coring ‘Gripper’ needle of correct gauge and length.
- Bionector or suitable needleless bung.
- Appropriate waste bag.
- Sharps container.
Ensure Blood specimen bottles are correctly labelled as per trust policy ensuring expiry dates checked.
| Step | Action | Rationale |
|---|---|---|
| 1 | Perform procedure using aseptic technique. Wash hands with bacterial soap and water or trust approved alcohol hand rub as per trust policy | To reduce risk of infection and contamination of blood samples obtained |
| 2 | Prepare tray and take to patient. Clean hands as above and open sterile pack and equipment | To reduce risk of contamination of contents |
| 3 | Clean hands with trust approved alcohol hand rub. Put on sterile gloves and apron. Using gauze from dressing pack, remove bung. Clean end of catheter line with Chlorhexidine 2% with 70% alcohol skin wipes (in individual packaging) and allow drying | To minimise risk of introducing infection.
To prevent contamination of practitioner’s hands with blood |
| 4 | Attach the 10ml syringe and withdraw blood sample | To obtain required volume of blood for sampling. Order of samples:
It is important to complete this task as soon as possible to prevent blood clotting in the line |
| 5 | Attach 10ml Luer Lock syringe, open the clamp and inject 10ml 0.9% sodium chloride adopting a pulsating motion to create turbulence within the line. Close the clamp and discard syringe | To flush blood from line to regain line patency |
| 6 | Attach the heparin sodium syringe, open the clamp and inject, adopting a pulsating motion to create turbulence within the line, clamp line whilst using positive pressure technique, and discard the syringe | To maintain patency and positive pressure in the line, needle and extension set |
| 6 | Flush new or sterile Bionector with 0.9% saline and Fit new or sterile Bionector | To prevent air entry, infection and allow needleless access |
| 6 | Dispose of waste in line with trust policy | To ensure appropriate selection on subsequent occasions |
5.7 Procedure to administer intravenous medications via an accessed Port-a-Cath
The administration of medications and solutions shall be initiated upon the order of a doctor or an authorised nurse prescriber or as part of a patient group direction (NMC 2008a).
Flushing with 0.9% sodium chloride solution to ensure and maintain patency shall be performed before, between and after the administration of incompatible medications and, or solutions. (RCN 2016; NICE 2003) the volume of the flush solution should be equal to at least twice the volume of the catheter and add-on devices, usually 5 to 10ml Heparin sodium as prescribed should be administered to ‘hep-lock’ the line on completion of administering medications and when not in use.
All flush solutions should only be administered following a prescription (National Patient Safety Agency 2008). A PGD is in place within the trust to support this.
5.7.1 Equipment
- Long Extension line with filter.
- 1 Chlorhexidine 2% with 70% alcohol skin wipes, for disinfection of hubs and connection ports.
- Appropriate pump if needed.
- 2 blunt needles (needs to be a blunt needle for plastic vial or a blunt filter needle for drawing up from a glass vial; alternatively filter medical straws can be used).
- Sterile pack with gloves and apron.
- Appropriate waste bag.
- Syringes appropriate for medication but no small than 10mls.
- 1 10ml flush saline.
- 1 10ml heparin for IV.
- Sharps container
- 60ml needed for infusion otherwise syringe size selected for dose if medication is bolus (no smaller than 10ml).
- Trust approved alcohol hand rub.
This is an aseptic non-touch technique (ANTT).
| Step | Action | Rationale |
|---|---|---|
| 1 | Identify correct patient as per trust policy | To minimise drug errors |
| 2 | Check prescription chart according to the local drug administration policy to ascertain type of medication and correct dosage needed. Check drug and expiry date | To ensure drug is given as prescribed, at the correct time, therefore minimising errors |
| 3 | Wash hands or use trust approved alcohol hand rub as per trust policy | To reduce risk of infection |
| 4 | Take prepared drugs to patient | |
| 5 | Prepare drugs as per local intravenous therapy guidelines | To ensure drugs are prepared and checked correctly |
| 6 | Clean Bionector using a Chlorhexidine 2% with 70% alcohol wipe (in individual packaging) | To prevent introduction of bacteria |
| 7 | Attach syringe containing 10ml 0.9% sodium chloride to Bionector using clockwise one quarter turn to lock syringe in place. Open clamp, draw back on the line until bloods flash back is seen. Inject using positive pressure technique, observe for any swelling around Port-a-Cath site. Ask patient if they feel any pain | To check patency of Port-a-Cath. Swelling can indicate extravasation. Pain can indicate complications |
| 8 | Clamp catheter: remove empty syringe and connect syringe containing first intravenous medication to Bionector, via extension line, secure syringe in Omnifuse pump and commence infusion. Or administer Bolus depending on medication and prescription | To provide positive pressure during infusion time |
| 9 | On completion of infusion, clamp extension line, remove empty syringe and attach syringe containing 10ml 0.9%, to extension line ensuring ANTT is adopted, unclamp, inject using positive pressure technique | To flush catheter, to remove residual medication and prevent problems from incompatibility.
To minimise risk of bacterial contamination |
| 10 | Clamp, remove empty syringe, discard and attach second medication syringe, unclamp the clamp and recommence infusion | To prevent reflux of blood into line |
| 11 | Clamp the clamp, remove and discard empty medication syringe | To prevent reflux of blood into line |
| 12 | Attach final syringe containing 10ml 0.9% sodium chloride, inject using positive pressure technique, clamp | To prevent reflux of blood into line |
| 13 | Remove empty syringe and discard | |
| 14 | Attach syringe containing heparin sodium as prescribed and give as bolus injection using positive pressure technique whilst clamping. Remove empty syringe and discard | To ‘hep-lock’ line, preventing reflux of blood and clotting |
| 15 | Dispose of waste in line with trust policy | Protection of patient, colleagues and Environment |
| 16 | Dispose of waste in line with trust policy | To ensure appropriate selection on subsequent occasions |
5.7.2 Troubleshooting
Immediate action is necessary to successfully restore patency. A Port-a- Cath may become blocked for several reasons:
- incorrect or infrequent flushing technique, infusion being switched off or running too slowly or precipitation formation due to inadequate flushing between solutions or drugs
- build-up of crystallised drug or ‘sludge’ in the Port-a-Cath chamber. Often characterised by gradual build-up of resistance when flushing. May be improved by more frequent flushes (for example, every 2 weeks)
- formation of blood clot at the catheter tip. Often characterised by sudden catheter occlusion when previous flushes have shown no resistance
- catheter rupture, usually there is sudden occlusion and this may be associated with pain or swelling
- patient complaining of swelling in hands or neck or face. Catheter tip has moved
5.7.3 Points to check
- Check that all clamps are open when attempting flush.
- Ensure that the needle is sited correctly. Is the needle pushed down far enough into the Port-a-Cath? re-needle if necessary.
- Is there any inflammation at the needle insertion site?
- Does the patient have any pain?
- Seek expert or medical advice.
Immediate referral to registered nurse or doctor with advanced knowledge in management of Port-a-Cath devices is appropriate if you still have concerns.
5.8 Procedure guideline to unblock an occlusion
Catheters may become occluded for a number of reasons, for example, not being flushed adequately or using the incorrect flushing technique, infusion being switched off or running too slowly or precipitation formation due to inadequate flushing between solutions or drugs. Clearance of a catheter occlusion is best performed using a negative pressure approach. The establishment of negative pressure within a catheter means creating a vacuum by aspiration of the air or ‘dead space’ within a catheter (Moureau 1999; Dougherty 2020; Gabriel 2008). Unblocking a catheter is not a quick procedure and can take up to 30 minutes to achieve success. Seek specialist nurse or medical advice if the line patency is not easily achieved.
5.8.1 Equipment
- Sterile dressing pack including gloves and apron.
- Trust approved Alcohol hand rub.
- 1 Chlorhexidine 2% with 70% alcohol skin wipes, individual sterile.
- Bionector (or needless injector cap).
- 10ml syringe.
- 0.9% sodium chloride as prescribed or PGD.
- Heparin Sodium as prescribed or PGD.
| Step | Action | Rationale |
|---|---|---|
| 1 | Explain and discuss the procedure with the patient | To ensure the patient understands the procedure and gives his or her consent (NMC 2008b) |
| 2 | Perform the procedure using ANTT | To minimise the risk of infection (DOH 2010) |
| 3 | Wash hands with soap and water or trust approved alcohol hand rub as per trust policy | To minimise the risk of cross infection (DOH 2010) |
| 4 | Open sterile dressing pack and empty equipment onto it | To create a clean working area (DOH 2010) |
| 5 | Clean hands using trust approved alcohol hand rub | As hands may have become contaminated opening outer packs (DOH 2010) |
| 6 | Clean connections using wipes before disconnection | To minimise infection risk at connection site (DOH 2010) |
| 7 | Remove any extension sets or injection caps | Occlusion may be in the extension set or cap and not in catheter |
| 8 | Attempt to flush with 0.9% sodium chloride using a 10ml syringe | Smaller syringes create excessive pressure which could result in catheter rupture (Conn 1993) |
| 9 | If there is pressure within the catheter lumen, attempt to gently instil the 0.9% sodium chloride using a ‘to and fro’ motion (push-pull) over a few minutes |
To attempt to clear the catheter (Gabriel 2008) |
| 10 | If nothing can be aspirated seek specialist advice. Child will be referred to hospital for further assessment | To commence negative pressure technique |
5.9 Actions to take if time period more than 6 weeks from the previous port flush
- If upon review of clinical record, the time period from the previous flush is greater than 6 weeks the port should not be flushed.
- Contact the lead clinician for the child or young person’s port-a-cath care to inform and for the arrangements to be made for them to review the patient.
- Inform the child or young person and family of the above and ensure they have the contact details for them to make arrangements to be seen for port-a-cath care.
- Record the above in clinical records and update care plan.
6 Training implications
Colleagues will receive instruction and direction regarding totally implantable venous access device (TIVAD) or Port-a-Cath procedures and information from a number of sources:
- policies and procedure manuals
- line manager
6.1 Totally implantable venous access device (TIVAD) or Port-a-Cath management policy and procedures
6.1.1 New starters and colleagues, relevant to role
- How often should this be undertaken: On employment and when required assessment of clinical skills with competency sign-off by colleague member with clinical skills competence.
- Length of training: Varied, relevant to knowledge and skills and opportunities to have supervised practice.
- Delivery method:
- simulation
- demonstration
- observation
- assessment
- Training delivered by whom: Competent confident trained colleagues up to date with relevant assessments.
- Where are the records of attendance held: Electronic colleague record system (ESR).
6.1.2 Dissemination of the policy and its content
- How often should this be undertaken: Upon ratification of the policy and to new starters.
- Delivery method: Email and face to face discussion.
- Training delivered by whom: Dissemination of the policy and its content.
- Where are the records of attendance held: Upon ratification of the policy and to new starters.
7 Equality impact assessment screening
To access the equality impact assessment for this policy, please email rdash.equalityanddiversity@nhs.net to request the document.
7.1 Privacy, dignity and respect
The NHS Constitution states that all patients should feel that their privacy and dignity are respected while they are in hospital. High Quality Care for All (2008), Lord Darzi’s review of the NHS, identifies the need to organise care around the individual, ‘not just clinically but in terms of dignity and respect’.
As a consequence the trust is required to articulate its intent to deliver care with privacy and dignity that treats all service users with respect. Therefore, all procedural documents will be considered, if relevant, to reflect the requirement to treat everyone with privacy, dignity and respect, (when appropriate this should also include how same sex accommodation is provided).
8.1.1 How this will be met
Care delivered within the scope of this policy will be within a community setting, in community hospital setting and in patients own homes.
Care will be organised taken the patients’ and families’ views and beliefs into consideration and all care will be delivered with consideration of the patients’ requirement of privacy.
8.2 Mental Capacity Act (2005)
Central to any aspect of care delivered to adults and young people aged 16 years or over will be the consideration of the individuals’ capacity to participate in the decision-making process. Consequently, no intervention should be carried out without either the individual’s informed consent, or the powers included in a legal framework, or by order of the court.
Therefore, the trust is required to make sure that all staff working with individuals who use our service are familiar with the provisions within the Mental Capacity Act (2005). For this reason all procedural documents will be considered, if relevant to reflect the provisions of the Mental Capacity Act (2005) to ensure that the rights of individual are protected and they are supported to make their own decisions where possible and that any decisions made on their behalf when they lack capacity are made in their best interests and least restrictive of their rights and freedoms.
8.2.1 How this will be met
All individuals involved in the implementation of this policy should do so in accordance with the guiding principles of the Mental Capacity Act (2005).
Patient’s capacity to make decisions will be considered within the assessment of delivering care within the scope of this policy. Where possible, patients or carers will be afforded the time and attention to make decisions for themselves wherever possible.
8 Links to any other associated documents
- Consent to care and treatment policy
- blood and body fluid spillages
- ANTT procedure
- Hand hygiene procedure
- Sharps management
- Heparin sodium to line lock a vascular access device administration patient group direction
- Sodium chloride 0.9% injection as a flush administration patient group direction
- Infection prevention and control manual
- Ethyl Chloride spray guidelines (staff access only)
- NICE Clinical Guideline 139 (2012, updated 2017) Prevention and Control of healthcare-associated infection in primary and community care
- Waste policy
9 References
- Baranowski, L. (1995) Central Venous Access Devices: Current technologies, uses and management strategies, Part 1. Canadian Intravenous nurses Association 11(2): pp 9 to 20
- Camp-Sorrell, D.; Cope, D.G. and Oncology Nursing Society (2004) Access Device Guidelines: Recommendations for Practice and education Second Edition. Oncology Nursing Society. Pittsburgh, Philadelphia
- Cochrane Library (2012) Totally Implantable Vascular Access Devices for Cystic Fibrosis
- Conn, C. (1993) The importance of syringe size when using implanted vascular access device. Journal of Vascular Access Networks (3)1: pp 11 to 17
- Department of Health (2010) Clean safe care. High Impact Intervention: Central Venous Catheter Care Bundle and Peripheral IV cannula care Bundle. Department of Health. London
- Dougherty, L. (2006) Central Venous Access Devices: Care and Management. Oxford: Blackwell
- Dougherty, L. and Lister, S. (eds) (2020). Vascular access devices, insertion and management In: Dougherty, L. and Lister, S. (eds) The Royal Marsden Hospital Manual of Clinical Nursing Procedures 8th Edition. Blackwell Science, London
- EPIC3: National Evidence-Based Guidelines for Preventing Healthcare-associated Infections in NHS Hospitals in England (2014) Journal of Infusion Nursing 26(5): pp 285 to 298
- Gabriel J (2008) Long term central venous access. In: Dougherty, L. and Lamb, J. (eds) Intravenous Therapy in Nursing Practice 2nd Edition: pp 321 to 351. Blackwell, Oxford
- Goodwin, M. and Carlson, I. (1993) The pulsating flush technique. Journal of Intravenous Nursing 16(2): pp 93 to 102
- Gorski, L.; Perucca, R. and Hunter, M. (2010) Central Venous access devices: care, maintenance and potential problems. In: Alexander, M.; Corrigan, A. Gorski, L. et al. (eds) Infusion Nursing an Evidence Based Approach 3rd Edition: pp 495 to 515
- Saunder Elsiever. St Louis. Hadaway, L.C. (2010) Anatomy and Physiology Related to Infusion Therapy. In: Alexander, M.; Corrigan, A. Gorski, L. et al. (eds) Infusion Nursing an Evidence Based Approach 3rd Edition: pp 137 to 177
- Hayden BK and Goodman M (2005) Chemotherapy: principles of administration In: Henke Yarbro, C. et al. (eds) Cancer Nursing, Principles and Practice 6th Edition: pp 351 to 411.
- Jones and Bartlett London. Homes, K. (1998) Comparison of push-pull versus discard method from central venous catheters for blood testing. Journal of Intravenous Nursing 21(5): pp 282 to285
- Janes Royle, T.; Davies, R.E. and Gannon, M.X. (2008) Totally Implanted Venous Access Devices, 20 years’ experience of Implantation in CF patients. Annals of the Royal College Surgeons 90(8): pp 679 to 684
- Moureau, N. (1999) Practising prevention with implanted ports: an overview. Journal of Vascular Access Devices 4(3): pp 30 to 35
- National Patient Safety Agency (2008) Intravenous Heparin Flush Solutions
- NICE (2012) Infection Control, Prevention of Healthcare Associated Infection in Primary and Community Care; Clinical Guideline CG139. National Institute for Health and Clinical Excellence. London
- Nursing and Midwifery Council (2018) The Code: Standards of conduct, performance and ethics for nurses and midwives
- Nursing and Midwifery Council (2008a) Standards for Medicines Management
- Parks, J.S.; Oh, H.R.; Seo, B.H. and Bhang J.H. (2006) Comparison of glass particle contamination according to method of ampoule cutting and needle aspiration. Taehan Kanho Hakhoe Chi 36(6): pp 1033 to 41
- Perucca, R. (2001). Obtaining Vascular Access. In: J. Hankin et al. (eds) Infusion Therapy in Clinical Practice 2nd edition: pp 375 to 388.
- W.B. Saunders. Philadelphia. Rowley, S. (2001) Aseptic non-touch technique (ANTT). Nursing Times: NT Plus (supplement) 97(7): pp 6 to 8
- Royal College of Nursing (2016) Infusion Nursing Standards of practice. (online) available at: Standards for Infusion Therapy, Royal College of Nursing
- Royal Marsden Clinical procedures (staff access only)
- Smiths Medical (2011) Clinician Guide: Port-a-Cath, Port-a-Cath II and ProPort Implantable Venous Access Systems PAS Port Implantable Peripheral Venous Access
- Simpson P.M. (1998) Introduction to Surgical Nursing. In: Simpson P.M. (ed) Introduction to Surgical Nursing. Balliere Tindall. London
- Todd, J. (1998) Peripherally inserted central catheters. Professional Nurse 13(5): pp 297 to 302
- Weinstein S (2007) Plumer’s Principles and Practices of Intravenous Therapy 8th Edition. Lippincott, Philadelphia
- Weinstein, S. and Hagle, M.E. (2014) Plumer’s Principles and Practice of Infusion Therapy, 9th edition. Philadelphia: Lippincott Williams and Wilkins
10 Appendices
10.1 Appendix A responsibilities, accountability and duties
10.1.1 Board of directors
Board of directors are responsible for ensuring there are policies in place that meet any legislation, national and local requirements and promote best practice.
10.1.2 Care group director
Care group director is responsible for the implementation of the policy within their specific areas.
10.1.3 Clinical leads or service managers
Clinical leads, or service managers have the responsibility to facilitate:
- all new colleagues whose role will involve TIVAD management should attend the clinical skills simulation training session and complete clinical skills training package
- colleagues whose duties include TIVAD management must attend the clinical skills training day and attend up-dates annually
- all clinical colleagues whose duties involve TIVAD management care can demonstrate compliance and competence in relation to the policy
10.1.4 Clinical colleagues
The individual nurse is accountable for their practice under the guidance of the Nursing and Midwifery Council Code of Professional Conduct (2015). Therefore, under no circumstances should a nurse undertake the management or care of TIVAD’s unless she or he has the appropriate knowledge and skills.
At all times, colleagues must adhere to their codes of professional conduct (Nursing Midwifery Council (NMC) 2018).
Note, it is the responsibility of the individual nurse to inform his or her manager if they do not have the appropriate training.
All colleagues are required to ensure accurate records are maintained at all times in accordance with the trust’s Healthcare record keeping policy.
10.2 Appendix B monitoring arrangements
10.2.1 Training compliance
- How: Follow up the nurse to complete required training.
- Who by: Senior children community nurses or a senior adult physical health community nurse.
- Reported to: Managers.
- Frequency: Yearly.
10.2.2 Any service user feedback, complaints or your opinion counts which relate to non-compliance with the standards in this policy
- How: Investigation, feedback, and review.
- Who by: Manager.
- Reported to: Care group quality and governance meeting.
- Frequency: Ongoing as the need arises.
10.2.3 Adherence to the use of the flushes under the patient group direction
- How: Annual audit.
- Who by: Nurse consultant in children’s services. By pharmacy team in adult services.
- Reported to: Team leader and care group quality meeting.
- Frequency: Yearly.
10.3 Appendix C aseptic non touch technique (ANTT) flowchart
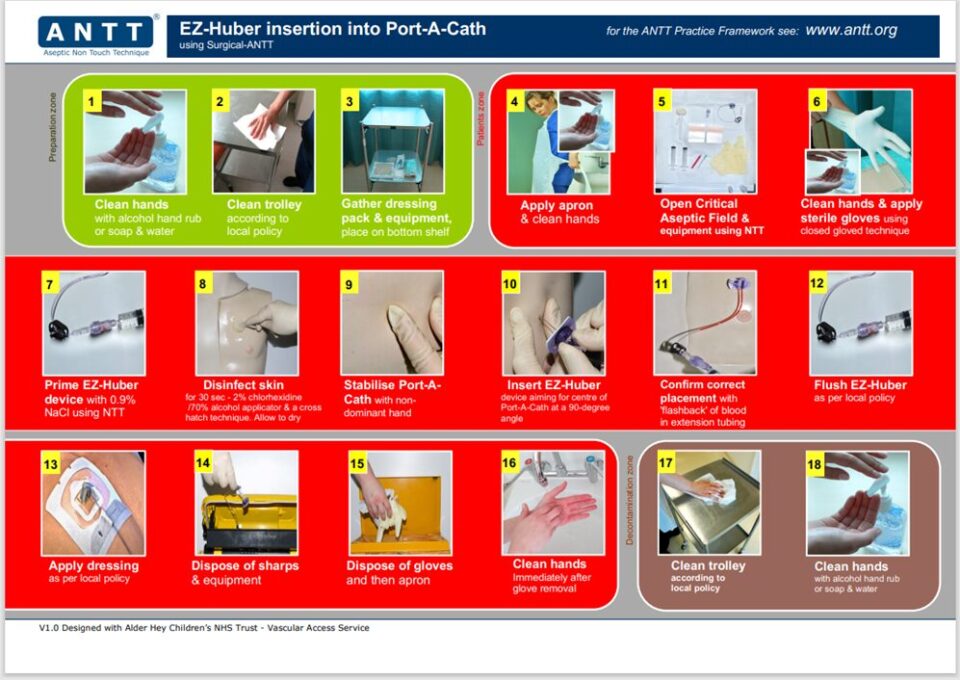
- Clean hands with alcohol and rub or soap and water.
- Clean trolley according to local policy.
- Gather dressing pack and equipment, place on bottom shelf.
- Apply apron and clean hands.
- Open critical Aseptic field and equipment using NTT.
- Clean hands and apply sterile gloves using closed gloved technique.
- Prime EZ-Huber device with 0.9% NaCl using NTT.
- Disinfect skin for 30 seconds, 2% chlorthexdine or 70% alcohol applicator and a cross hatch technique. Allow to dry.
- Stabilise Port-A-Cath with non-dominant hand.
- Insert EZ-Huber device aiming for centre of Port-A-Cath at 90-degree angle.
- Confirm correct placement with flashback of blood in extension tubing.
- Flush EZ-Huber as per local policy.
- Apply dressing as per local policy.
- Dispose of sharps and equipment.
- Dispose of gloves then apron.
- Clean hands immediately after glove removal.
- Clean trolley according to local policy.
- Clean hands with alcohol hand rub or soap and water.
Document control
- Version: 4.1.
- Unique reference number: 400.
- Approved by: Clinical policy review and approval group.
- Date approved: July 2024.
- Name of originator or author: Nurse consultant (children’s care group).
- Name of responsible individual: Chief nurse.
- Date issued: July 2024 (amendment).
- Review date: 30 April 2026.
- Target audience: Children’s community nurses and adult physical health community nurses.
Page last reviewed: December 10, 2025
Next review due: December 10, 2026
Problem with this page?
Please tell us about any problems you have found with this web page.
Report a problem